


Understanding the Components of Your Eavestrough
Whether you’re considering new eavestroughs for your home or simply wondering about the ones you have, it’s important to understand how the components work together to keep your home protected from unwanted water.
We’ve put together this diagram (including definitions) to help you better understand how your eavestroughs really work:
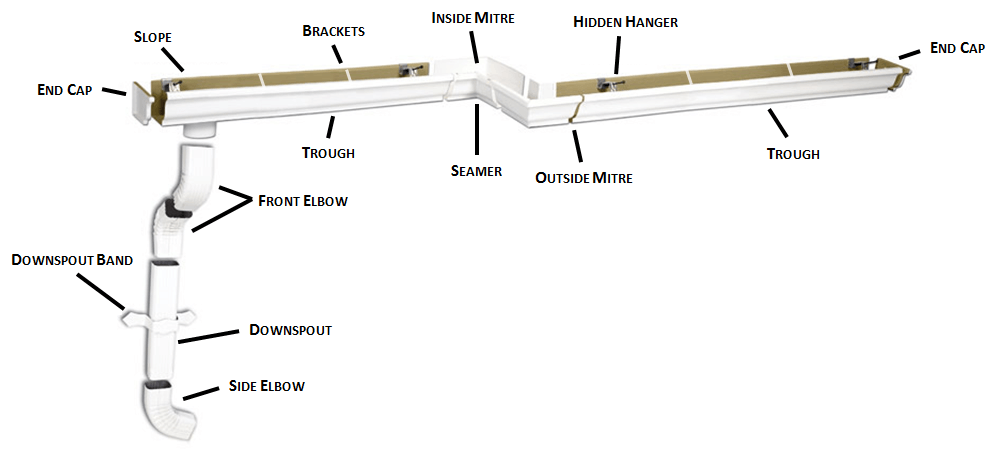
End Cap
End caps are put in place to prevent water from running out of the end of your eavestroughs. They’re more prevalent on older sheer-metal eavestroughs and copper systems, as modern aluminum eavestroughs more frequently have crimped caps held in place by mastic or caulk.
Trough
The trough is the heart of the eavestrough. It’s fitted below the eaves (the edges of your roof overhanging the side of the wall) and is designed to channel water off your roof and away from your foundation – protecting your home from water damage.
Back To Top
Hidden Hangers and Brackets
Hidden hangers hold your eavestroughs in place by attaching them firmly to the roof, giving them discrete and clean structural support, while brackets help brace your eavestroughs further along. They are generally available in a range of materials, designs, and colours to blend seamlessly with your eavestroughs. Hidden hangers should be spaced six inches from either end of the eavestrough section. Brackets should be placed every two feet.
Outside and Inside Mitres
Inside and outside mitres are used at corners and junctions to help direct the flow of water. There are two types of mitred corners:
- Pre-Made Factory Corners: These are ready to go and easy to attach. The downside, though, is that the seams of pre-made corners are more visible, and they’re more prone to premature wear and tear.
- Hand-Mitred Corners: These take more time and skill to make, but they’re worth it. Hand-mitred corners are created specifically for your eavestrough, ensuring a seamless appearance. They also last longer, as water doesn’t become blocked by additional caulking used to join pre-made factory corners.
Seamer
Otherwise called a joining bracket, seamers are used to connect two trough sections together. Sealant needs to be applied and feathered out to ensure a thick, waterproof seal.
Slope
Although your eavestroughs might appear straight from the ground, in reality they need to be sloped a little bit to encourage water to flow downhill. The slope – also called the pitch – is the degree eavestroughs slant downward along the path of the water flow. Remember, it needs to be precise. If the slope is too slight, you’ll experience pooling and spilling. If too extreme, the capacity of your eavestroughs will be compromised.
Back To Top
Front and Side Elbows
Elbows are used when your eavestrough needs to make a turn, directing water down the right path.
- Front elbows direct water forwards or backwards from the outlet.
- Side elbows direct water left or right from the outlet.
Downspout and Downspout Band
Downspouts have a critical role to play as part of your eavestrough system. The downspout itself is the hollow tube that runs from your roof edge to the ground, carrying water away with it. The downspout band holds the downspout in place.
At the bottom, the downspout needs to run onto a splash block or other receptacle like a rain barrel, trench, or ground well. If water isn’t directed away from your home’s foundation – whether because it’s not being properly controlled or it’s blocked and backed up in the eavestrough – it can pool and cause structural damage.
Working with experienced home contractors to install a quality eavestrough system is the best way to protect your home from damage and keep it looking its best for years to come.
At Quality Exteriors, we’re committed to providing effective gutter protection and eavestroughs for customers throughout Southern Ontario. Contact us today to schedule a free in-home consultation!
Like this? You might also like:
- Keep Eavestroughs Clear All Year with Alu-Rex’s Gutter Protection Systems [Video]
- 5 Tips for Cleaning Your Eavestroughs This Spring
- Drafty? Don’t Lose Money on Leaky Windows and Doors

- When to Request an Estimate for Exterior Work - February 26, 2020
- Merry Christmas from Quality Exteriors - December 18, 2019
- Quality Exteriors Listed In Top 3 Window Companies In St. Catharines - December 5, 2019